A broken or crumbling septic tank lid isn’t just an eyesore. It’s a genuine fall hazard, especially for children and pets who may not know where the tank sits. If your lid is cracked, missing, or buried so deep you need a map to find it, now is the right time to replace it.

Why septic lids fail (and the safety risk)
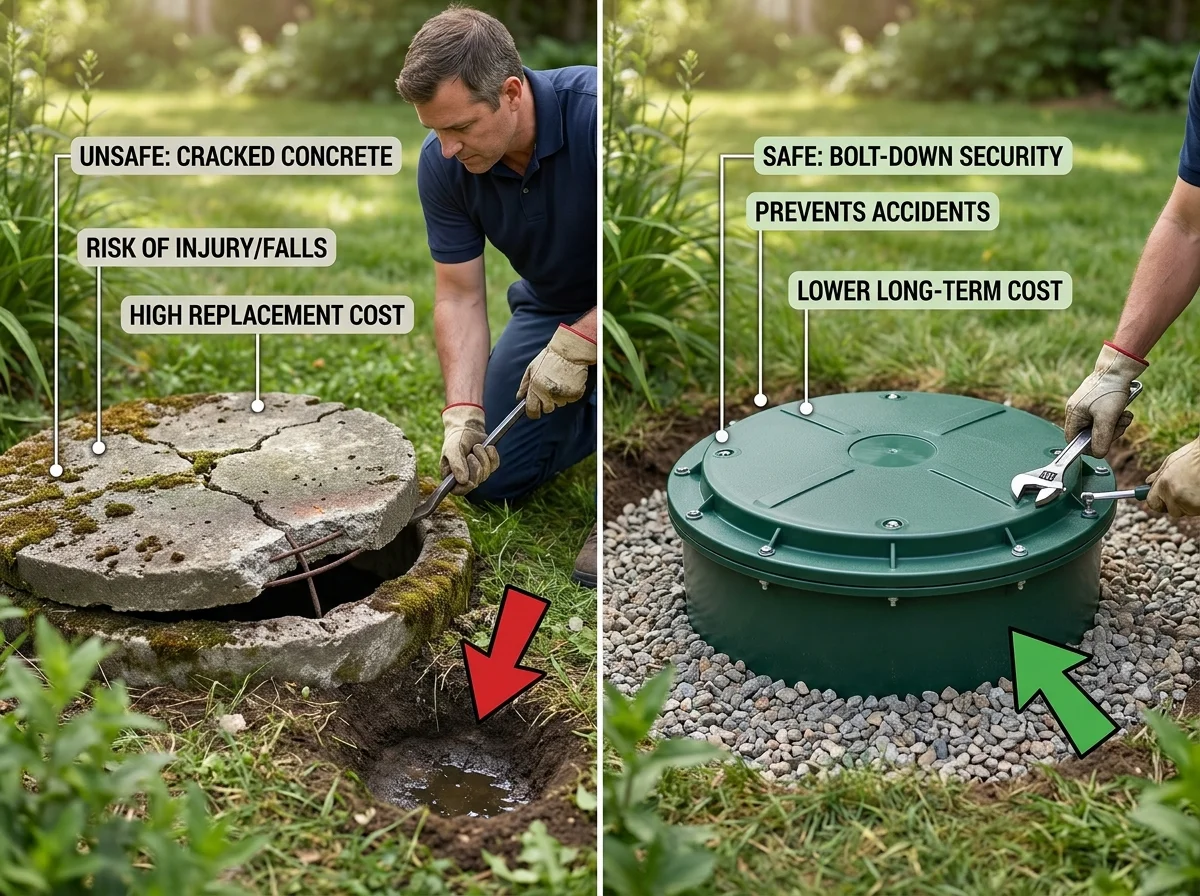
Most tanks in San Diego County installed before the 1990s have concrete lids. Concrete is heavy and durable, but it doesn’t last forever. Ground movement, tree roots, acid from hydrogen sulfide gas, and repeated heavy vehicle traffic all accelerate cracking. Once a crack develops, it widens fast.
A collapsed lid is a serious hazard. Septic tanks are typically 4 to 8 feet deep. A child or adult who steps through a lid can fall directly into an enclosed space filled with toxic gases, including hydrogen sulfide and methane. The US EPA lists confined space hazards as one of the top reasons homeowners should never enter a septic tank and should call a licensed contractor for any work near an open access point.
Beyond the fall risk, a cracked or loose lid lets in surface water and debris, which upsets the bacterial balance inside the tank. Too much water dilutes the effluent, pushes solids into your drain field, and can trigger a premature failure that costs far more to fix than a lid swap.
Lid failure typically shows up as visible cracks across the surface, concrete that crumbles when you press on it, soil subsidence or a soft spot in the yard above the tank, or a lid that moves or wobbles under foot pressure. Any of these means it’s time to act.
Concrete vs. plastic lids and risers
Two materials dominate the replacement market: precast concrete and high-density polyethylene (HDPE) plastic.
Concrete lids are heavy (often 150 to 300 pounds), which makes them hard to steal and difficult for small children to lift. But that same weight makes them harder for technicians to remove during service. Concrete also continues to degrade in contact with septic gases. A replacement concrete lid will eventually need to be replaced again.
Plastic (HDPE) lids weigh far less, typically 15 to 40 pounds, resist corrosion from hydrogen sulfide, and can be ordered with locking bolts that prevent unauthorized access. When paired with a plastic riser, they’re the standard recommendation for any new replacement today. Plastic doesn’t crack under normal conditions, and it holds up better to San Diego’s mild but occasionally seismic soil movement.
The lid material decision is closely tied to whether you add a riser at the same time. More on that below.
What replacement costs in San Diego County
Lid replacement cost varies based on whether you’re swapping a like-for-like lid or combining the replacement with a riser installation. In San Diego County, here’s what you can expect:
Concrete lid only (swap at grade): $150-$350, depending on tank size and lid weight. Labor is typically 1 to 2 hours. The lid has to be located, excavated, and the new lid matched to the existing access opening.
Plastic lid swap (no riser): $125-$275. Plastic lids are easier to handle, which keeps labor time down.
Lid plus riser installation: $400-$900 for a single access port, depending on how deep the tank sits and whether the riser body needs to be extended to reach grade. Some tanks have two access points, which doubles that estimate. This is the most common scenario for older SD County systems where the tank is buried 2 or more feet down.
San Diego County Environmental Health typically requires a permit for full septic system work, but a simple lid replacement or riser addition often falls below the permit threshold. Your contractor should clarify this before the job starts. For permit questions, you can reference the San Diego County Department of Environmental Health land use program directly.
Prices above reflect San Diego County market rates as of 2026 and don’t include excavation for tanks buried unusually deep or situations where the access opening itself needs to be rebuilt.
Can you replace a septic tank lid yourself?
Technically, a homeowner can purchase a replacement lid and set it in place. The question is whether that’s a good idea.
Here’s the issue: you need to open the tank to confirm the access opening dimensions before ordering a replacement. Opening a septic tank without proper ventilation equipment exposes you to hydrogen sulfide, a colorless gas that can incapacitate you in seconds at high concentrations. The California Water Boards OWTS Policy exists in part because septic systems can be genuinely dangerous when improperly handled.
Beyond the gas risk, you need to confirm the lid size and ring diameter exactly. A lid that doesn’t seat flush creates a new hazard instead of solving the old one. If the tank has concrete rings underneath that are also cracked or degraded, a lid swap alone won’t fix the problem.
For most homeowners, the smart call is to have a licensed contractor handle it. In California, septic contractors are licensed under CSLB Class C-42 (Sanitation System Contractor). Verify any contractor’s license at the CSLB license lookup before they start work.
Upgrading to a riser while you’re at it
If you’re already paying to replace a lid, it’s worth considering a riser at the same time. A riser is a vertical pipe section that extends the access opening from the tank up to ground level, so future lid removal requires zero digging.
Without a riser, pumping a buried tank means the technician spends 30 to 60 minutes digging down to the lid first, which adds labor cost to every service call. With a riser, the lid is right at the surface. Pumping visits are faster, cheaper, and the technician can actually see what’s happening at the access point.
If your tank is buried more than 12 to 18 inches, a riser pays for itself in 2 to 3 pump cycles. Our post on why install septic risers covers the math in detail. For a full installation, see our septic riser installation service.
The ideal time to add a riser is exactly now, during a lid replacement, because the tank access point is already being addressed. Combining the two jobs into a single visit saves on labor compared to scheduling them separately.
Getting a lid replaced safely
Before the technician arrives, it helps to know roughly where your tank is. If you’re unsure, our guide on how to find your septic tank walks through the most reliable methods, including checking permit records through San Diego County.
On the day of service, the technician will locate and expose the access point, assess the condition of the existing lid and the concrete or plastic riser ring beneath it, take measurements, and install the replacement lid. If a riser is being added, that work happens in the same visit. The whole job typically takes 1 to 3 hours depending on depth and whether the tank has one or two access ports.
After the lid is installed, a quality contractor will confirm the lid seats flat, the locking mechanism (if applicable) functions correctly, and the surrounding soil is tamped back down neatly.
If the technician discovers other issues during the visit, such as a damaged baffle or tee, they should document what they found before recommending any additional work. A good contractor tells you what’s there, explains the risk, and lets you decide.
When to call us
If your lid is cracked, sunken, or you’re not sure it’s safe, don’t wait on it. A failing lid is a fall hazard that can injure someone before your next scheduled pump. If your tank is buried and you’ve never had a riser installed, combining both repairs now is the most cost-effective path forward. Call us at (858) 925-5546 for a same-day estimate.